Church Streaming and Multimedia Guide
-
Hey, this is the guide I wrote for the Mutlimedia crew with the new streaming setup. If sections of the "turning everything on" section don't seem to make sense, everything is explained later on.
Turning everything on
Start by turning the projector on with the Sony remote on the desk. To do this, walk up to the front of the Church and turn the projector on. While you’re up there, use the screen controls on the wall near the projector (as seen to the right) to position the screen to include all the pixels of the projector.Turn the square lights on with the on/off switch on the back of them. These light up the flowers to the right of the projector and the wall behind the front table, both to highlight and reduce how dark both of these areas appear on the cameras.
Also turn the large defused light on that’s to the left on the stage with the inline switch on the cord.
After everything is setup at the front of the Church, you can start turning on everything at the desk. Turn the computer on, which is located on the right side of the desk. (the on button is in a dumb location to refer to the image below to find it) then turn the sound system on with the controls board under the desk on the left.
Then you’ll need to turn the cameras on. Using the ladder behind the desk, remove the lens caps and turn the cameras on. The on button can be seen in the photo below and must be pressed firmly till the screen on it turns on. Please do not adjust or move these cameras.
After this, use the stream desk to open OBS and proclaim. When OBS opens, drag the window to the top of the screen to fullscreen it. Makes sure Proclaim is opened to the correct service. This can be found under File > Open Recent > //Service time and date// Order of Service.
After the correct service is opened, use the Stream Deck to check that all the scenes and cameras are operating and positioned correctly in OBS. If cameras are not showing up, make sure they are turned on.
OBS
OBS (open broadcasting software) is a streaming and recording tool that broadcasts and manages our live stream before it gets sent to Twitch and our website.
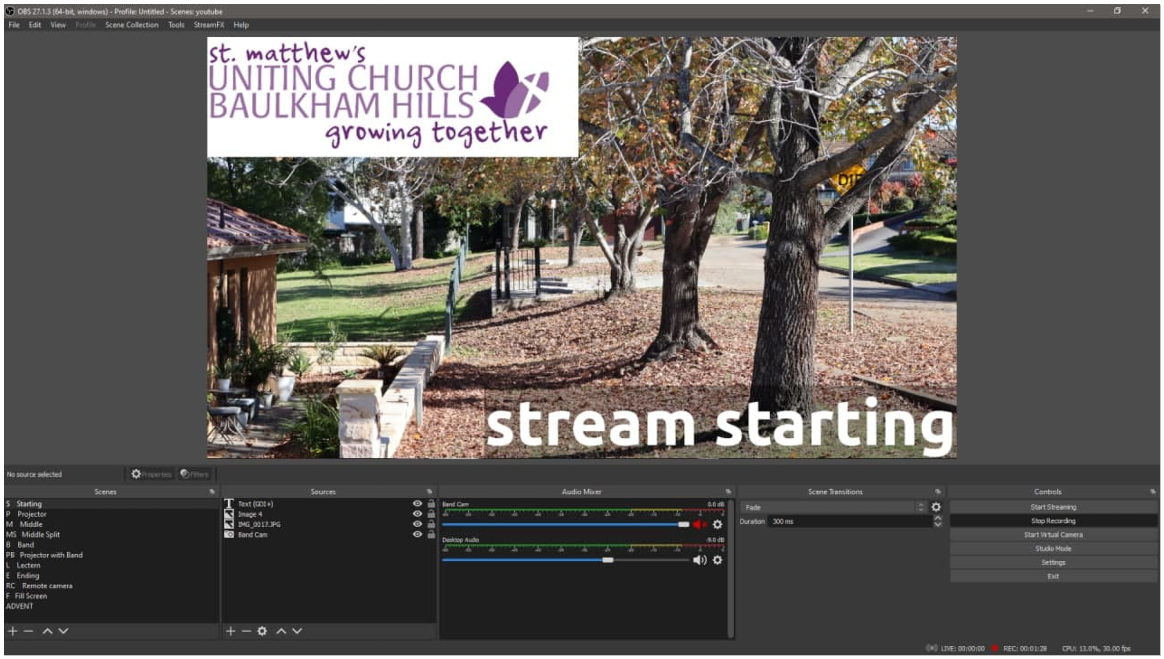 (I need to update this image to have the twitch UI)
OBS seems like a very daunting software when you first begin to use it, but everything has been pre-setup for your use, and integrates with the stream deck. You must not change any of these settings unless referred in this guide.
To start the stream, which should happen at least 10 minutes before the service begins, select the ‘S starting’ screen from the Stream Deck and click “Start Streaming” then click "YES" in the are you sure dialogue box that appears.
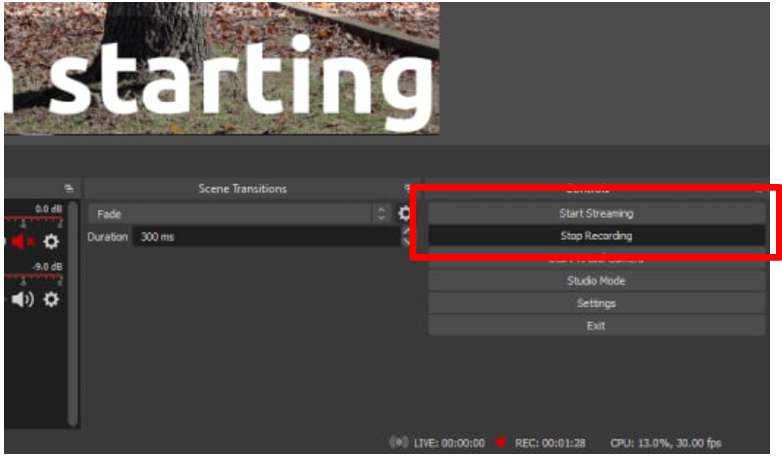
Below is a list of each screen in OBS and a guide for which one to use in which situation.
Choosing which Scene to use in OBS:
• S Starting: your starting screen. It has no audio and is a stationary image for when the stream is starting and there is no music playing. This is perfect for showing the stream will be going live soon while you are still setting things up.
• P Projector: a view of the projector with band style audio capture. This is used for the beginning and end of the service when music is being played.
• M Middle: the main camera pointed at the middle speaking position. It is your go to scene when someone is up the front talking.
• MS Middle Split: uses the Middle camera combined with the projector view. This is for whenever someone standing up the front is using the projector screen and you want to show both the speaker and their content.
• B Band: uses our secondary camera to focus on the band.
• PB P W Band: for all performed music with lyrics. It shows the projected slides with the band in the bottom right corner.
• L Lectern: uses our secondary camera to zoom in on the lectern with slides next to it. Due to our current limitations, anything done at the lectern must have slides in proclaim to go along with it, even if this is a ‘filler’ picture.
• E Ending: for the end of the stream. Like the starting scene beginning a service, this should be used shortly after the end of the service.
• RC Remote Camera: addressed later in the guide.
• Communion: A new option that uses the Middle camera and makes the slides much smaller for when people are standing outside the camera display in Middle Split
Twitch
Twitch is an online streaming website that we are using to stream our services. It is more streamlined than YouTube for streaming and integrates well with OBS. OBS has inbuilt twitch functionality, so you can see the chat and all title information for the stream. The title, chat and other sections should be set before the service. Click ‘done’ for these sections before starting the stream.
(screenshot of the twitch UI in OBS)Stream Deck
The Stream deck is a very useful and simple piece of hardware. It controls functions on the computer and integrates directly with OBS. The main page features the OBS integration, including camera screens, as well as other functions. On page 2 there are links to create thumbnails along with other functions for editing the recorded videos before they are uploaded to YouTube. Feel free to try each button out to familiarise yourself with its functionality!
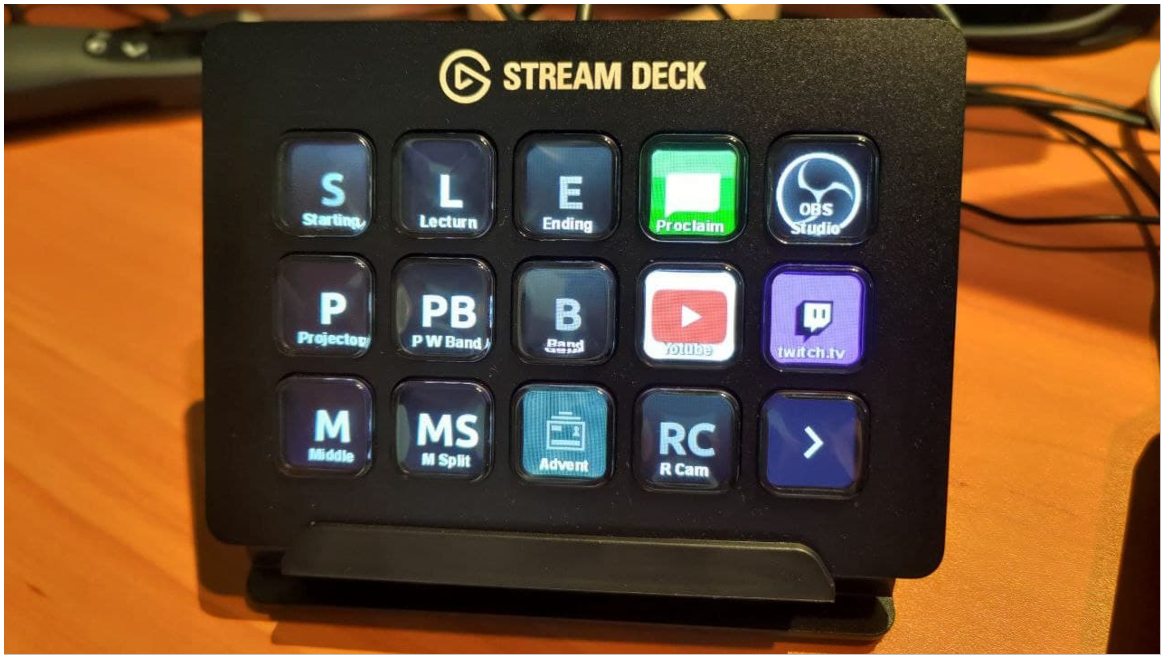 (this image needs to be replaced with an updated one)
Proclaim
Proclaim is a more streamlined version of Powerpoint. The slides will be set up for you by the Church office, so all you have to do is advance the slides when needed.
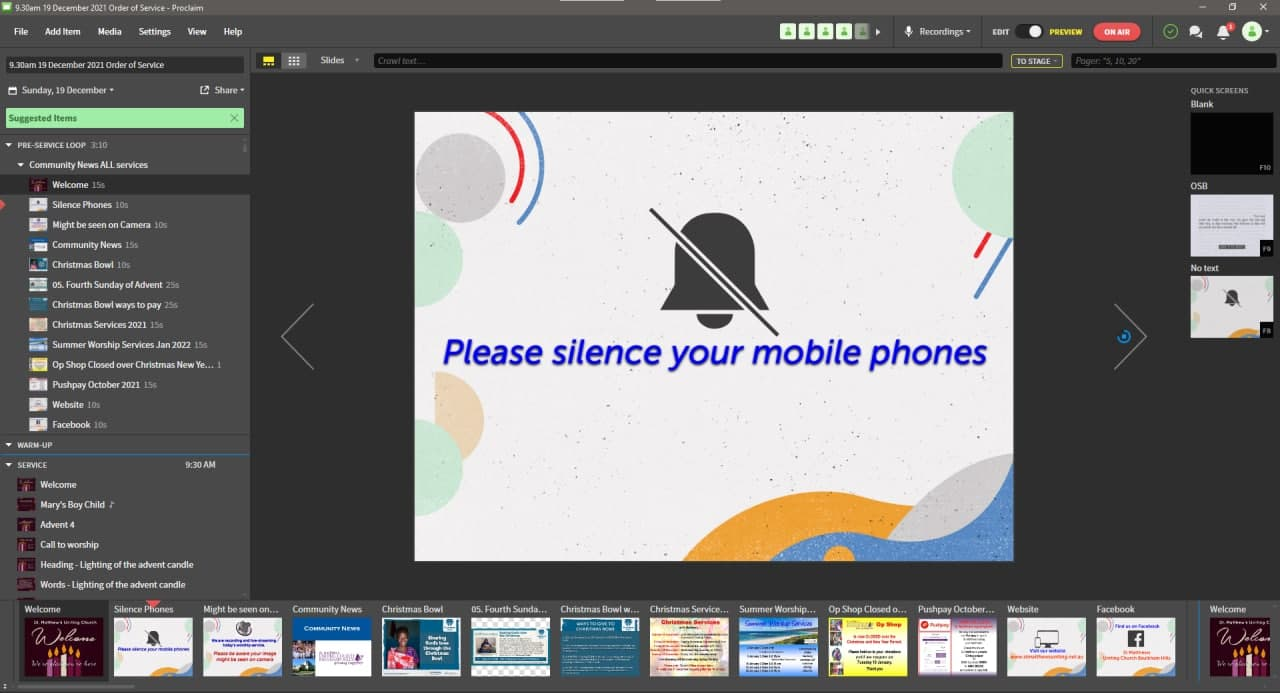
Proclaim’s functions have not changed and operates as normal with only 1 exception. A black screen on a proclaim slide will also show a black screen on the livestream. This can give the impression of the livestream being broken or offline so we have requested that any “blank” slides be replaced by backgrounds instead. If this isn’t the case, you can use the F8 key on the keyboard to temporarily remove the text from a slide.Audio
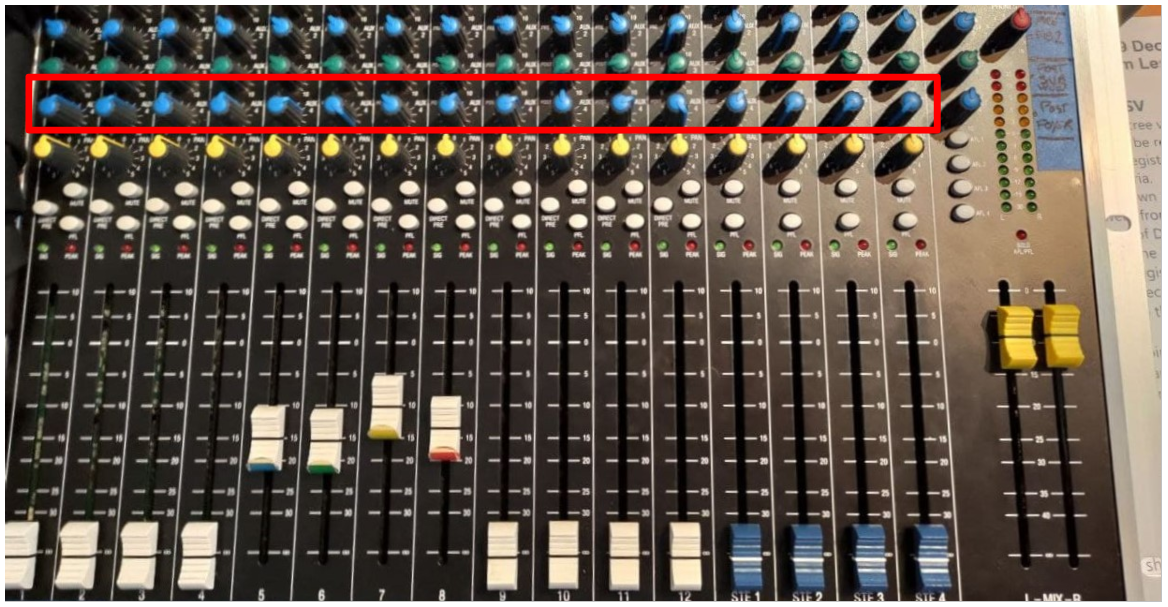
Audio is the most important part of digital media. When streamed, poor image quality used with good audio will be seen as passable and enjoyable. When good image quality is streamed with low audio quality, it can be seen as low quality and hard to watch.It is the role of the audio operator to keep tabs on the audio levels on OBS along with the room audio. Firstly, the person on audio should set the audio for the house (within the church) and then use the headphones and the bottom blue row of knobs on the sound desk to adjust the levels on stream. Adjust levels to your sound preference and then attempt to keep the max audio volume within the yellow sound level on OBS.
The hanging microphone is now a key part of our live stream for music so we can hear the congregation singing in the hall. When you switch to the band or projector screens with the ‘B Band’ or “PB P W Band’, turn the hanging microphone up to the bottom 30 level as seen below.
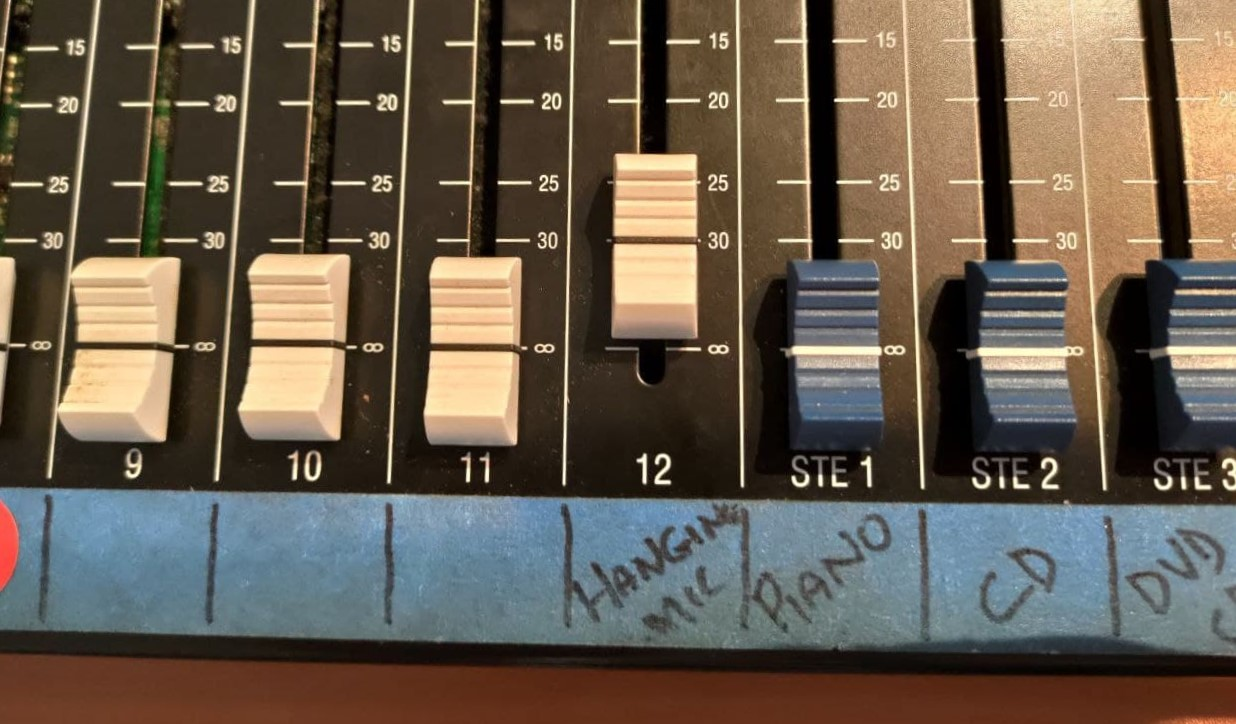
Note: NEVER TURN UP THE VOLUME OF THE PC ON THE BOTTOM BLUE KNOB LINE, ONLY USE THE SLIDERUsing Microphones
To be heard on the live stream, microphones must be used correctly. Please note: IF YOU DO NOT USE A MICROPHONE, NO ONE WILL HEAR YOU ON THE LIVESTREAM.Handheld microphones should be held or positioned in front of the user’s mouth and pointed towards it.
For lapel microphones, the microphone head should not be touching any fabric or body part and should not be adjusted when live.
For the lectern microphone, users should direct the microphone towards their mouth and speak into or towards it.
Where to stand in the church
When standing at the front of the Church, speakers must stand between the masking tape lines as seen below. The inner masking tape markers show the area captured by the ‘P Projector’ screen. The outer markers show the total extent of the camera.
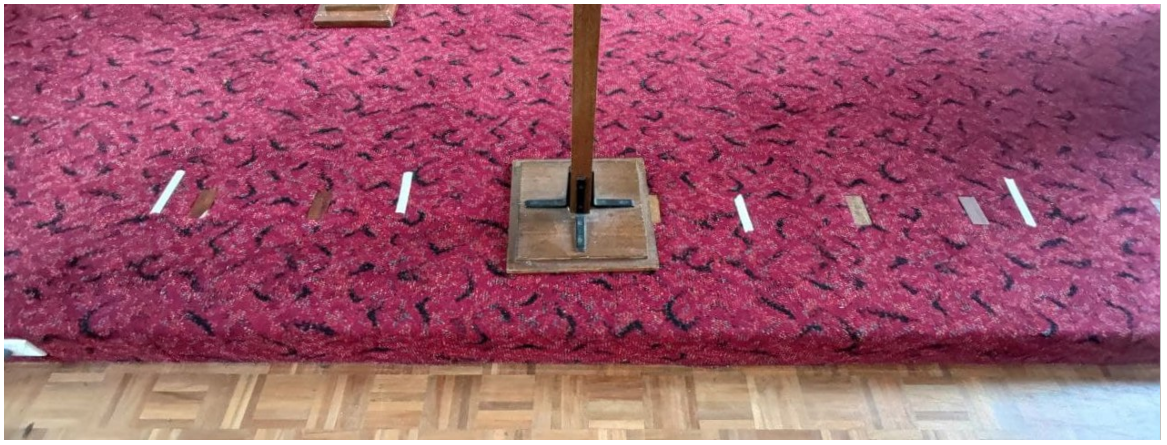
Please note:- The entire band is in the Band shot.
- Lectern users must stand directly behind the lectern.
- If any part of the service is happening outside of these locations (for example a Puppet Show to the side), a remote camera must be used.
Remote Camera
The small tablet that is currently charging at the computer is used for both music and a remote camera. IP Webcam is an app that streams a phones or tablet’s camera signal though Wi-Fi to OBS. If anyone is doing anything outside the designated areas stated above, this will need to be set and tested it before the service. You will also need a third person outside of the two desk operators to use it. As this is not ideal, it is preferred to encourage the use of this as little as possible.To begin using the remote camera, unplug the phone and open the IP Webcam app on the home screen. Scroll to the bottom and tap the “Start Server” screen. Switch to the scene on OBS using the ‘RC R Cam’ button on the StreamDeck (which should refresh the source in OBS).
If the camera operator wishes, there is a monopod and phone mount that can be used so they don’t have to hold the camera up for the time it is in use. The phone camera can be moved anywhere within the church for multiple shots if desired.
-
Moved from Members Only by
 algebuckina
If you wish to comment or contribute to our website, please feel free to register for an account.
Registry and posting is approval based so please be patient as a moderator will attend to your request shortly.
© 2023 St Matthew's Uniting Church | Built by Bradley Turner of Algebuckina Design
